Fat Transfer Breast Augmentation: What to Expect Before, During, and After
You’ve been researching your options for months, and fat transfer breast augmentation keeps coming up as the more natural alternative. Unlike silicone or saline implants, fat transfer to breast tissue uses your own body fat — harvested from your abdomen, thighs, or flanks — to add subtle volume where you want it. The appeal is real: no foreign material, a simultaneous slimming elsewhere, and results that feel like actual tissue because they are. But breast fat transfer isn’t for everyone, and setting accurate expectations from the start makes all the difference.
If you’re considering breast augmentation with fat transfer, you’ve probably also wondered whether you qualify, how much size you can gain, and what recovery actually looks like. This guide covers all of it, so you can go into any consultation knowing exactly what questions to ask — because the lowest calorie craft beer of cosmetic procedures this is not. Like most things worth doing, there are real trade-offs to weigh.
What Is Fat Transfer Breast Augmentation?
This procedure combines two operations into one session: liposuction to remove unwanted fat from a donor site and injection of that fat into the breasts to increase size and improve contour. Unlike implants, which add a fixed volume of synthetic material, a fat-based approach integrates living tissue into your existing breast structure. Board-certified plastic surgeons generally perform the entire procedure under general anesthesia or IV sedation, and operating time runs between two and four hours depending on the volume being transferred.
How the Fat Transfer Process Works
Liposuction and Fat Harvesting
Your surgeon marks the donor areas — commonly the abdomen, inner thighs, or flanks — before any incisions are made. Small cannulas, roughly 3–4 mm in diameter, break up and suction out the fat using low-pressure techniques to keep the cells viable. Damaging fat cells at this stage reduces the percentage that survive after transfer, so the harvesting method matters significantly.
Purification and Preparation
Once collected, the raw lipoaspirate goes through centrifugation or filtration to separate living fat cells from oil, blood, and fluid. The purified cells are loaded into smaller syringes — often 1 cc at a time — ready for precise placement. This step typically takes 20–30 minutes and directly affects how much usable fat you end up with.
Injection into the Breast
Your surgeon uses blunt-tipped cannulas to deposit fat in fine threads throughout multiple layers of breast tissue. Placing it in thin passes, rather than large boluses, allows each pocket of fat to contact enough blood supply to survive. Most surgeons inject 20–30% more than the target volume to account for the natural resorption that occurs in the first three months.
Who Is a Good Candidate?
The ideal patient wants a modest size increase — typically one cup size — and already has enough body fat available for harvesting. If your BMI sits below 18.5 or you have very little subcutaneous fat, there simply isn’t enough donor material for a meaningful transfer. You also need realistic expectations: this technique is not designed to produce the dramatic change that implants achieve. Patients correcting minor asymmetry, restoring post-pregnancy volume loss, or softening the look of existing implants often see the best outcomes.
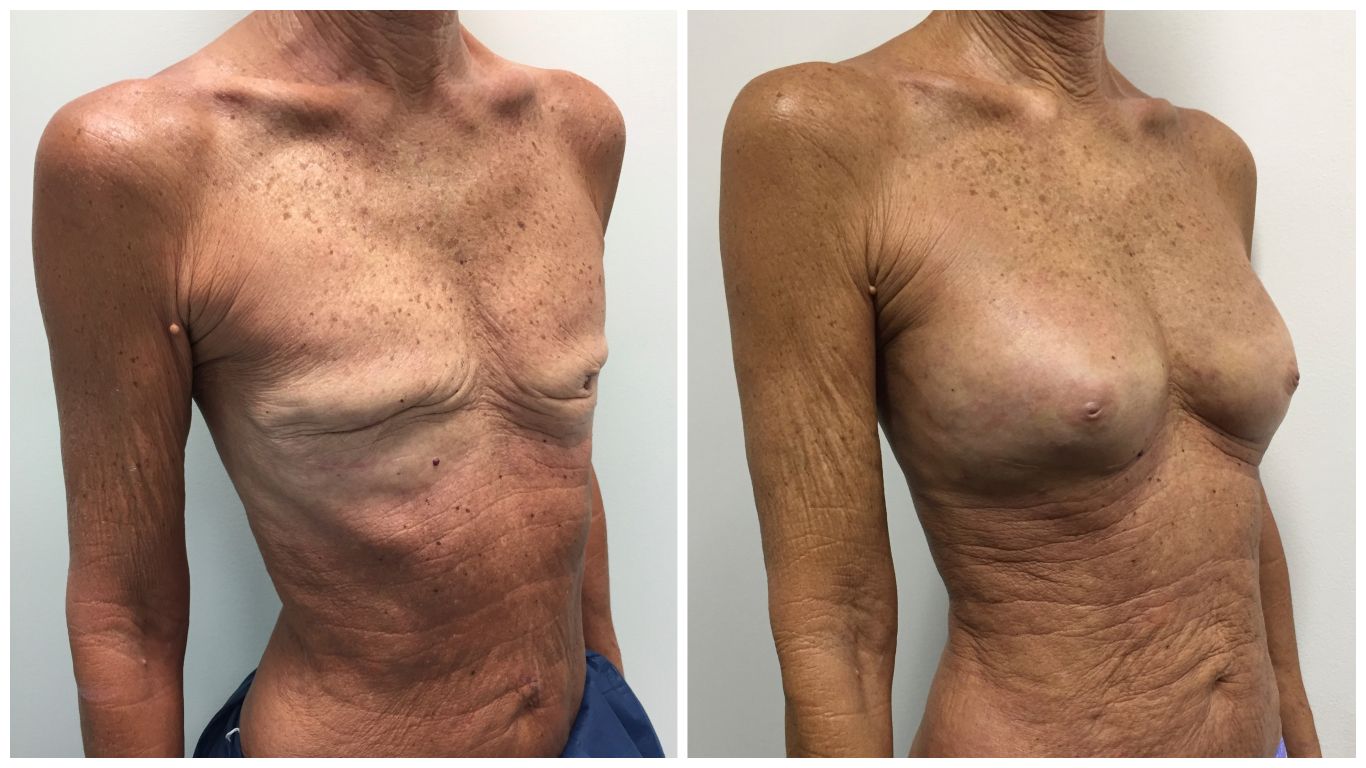
Results: Volume, Shape, and Feel
Transferred fat that survives the initial engraftment period — usually determined by the six-month mark — is permanent. On average, 50–70% of injected fat cells take hold; the rest resorbs. Your breasts feel soft and move naturally because the added tissue is biologically yours. Volume gains are modest but proportionate, and many patients appreciate the simultaneous contouring of the donor site. The final result stabilizes between three and six months post-op, once swelling resolves and surviving fat cells integrate fully.
Recovery Timeline and What to Expect
The first 48–72 hours bring soreness at both the donor and recipient sites, along with visible bruising and swelling. Most patients handle light daily tasks within a week, though returning to exercise takes four to six weeks. You’ll wear a compression garment over the liposuction areas for two to four weeks to control swelling and support healing. Breast massage may or may not be recommended depending on your surgeon’s protocol — follow their specific instructions rather than general advice found online.
Risks and Limitations to Know
Fat necrosis — when injected fat cells die and form firm nodules — is the most common complication, occurring in roughly 1–5% of cases. These nodules are usually benign but can show up on mammograms as calcifications, which occasionally require additional imaging to rule out pathology. Oil cysts are another possibility. Serious complications like infection or fat embolism are rare but exist. Discuss your mammogram history with your surgeon, particularly if you’re over 40, because baseline imaging before the procedure helps radiologists interpret post-op findings accurately.
How It Compares to Implants
Implants offer predictable, larger volume gains in a single operation, while fat grafting produces subtler, more natural-feeling results with the bonus of body contouring. Implants carry their own risks — rupture, capsular contracture, the need for eventual replacement — that fat transfer avoids. Cost is comparable when you factor in the combined liposuction component. The right choice depends on how much volume change you want, your body composition, and your tolerance for the inherent unpredictability of graft survival. Many surgeons recommend consulting with someone who performs both so you receive an unbiased assessment of which approach fits your anatomy and goals.